Tuesday, March 18, 2008

Allow me to officially introduce you....

It occurred to me recently that I have not officially introduced you to our house!

Forgive my manners.

You?

Our House.
Joe and I weren't crazy about the screened-in porch.  One day, Joe went to New Hampshire with work for a day-long hike.  When he left, we had a screened-in porch.

When he came home, we didn't. 


Me + a few hours in the sun + a five pound sledge = no more screens.

Somewhere around a year later we ripped out those ugly bushes.  We also ditched all of the plants along the side of the house.  


Oh yeah.  We also cut down the trees in the back yard.  We would have liked to keep the apple tree, but the main trunk and one half of the "v" growing out of it were rotted.  Se we cut it down.  That was an exciting day.  Joe's step-brother Neil came over with a big saw, a bigger truck, and tree-cutting experience.  A few hours, heart attacks, and near-misses later, Joe and Neil felled the tree; only narrowly managing to avoid doing so through the ceiling of our brand new bathroom while I was brushing my teeth inside of it.

Neil hasn't cut a tree down since.


The other little tree also got axed.  The stumps are still there.  Thus far they proved useful for supporting pumpkins while we shot apples at them with our neighbors homemade potato gun.

Good times.

We will have a ton of landscaping to do, but we aren't even going to start thinking about the outside until we finish the upstairs bathroom.

Which reminds me, I need to start taking pictures in there, too, before we get too much further along...

Monday, March 17, 2008

A look at the loo.

Unfortunately, when we doing a lot of the work on the bathroom, my camera had a dead battery and a charger that was nowhere to be found.

I think there are some before pictures floating around on cameras other than mine, and I will try to track them down.

For now, I offer after pictures.

This is my favorite part of the bathroom.  It was our first tile job, so it's not great.  But I love the tiles.  I chose a 6" square tile for the center.  We took the same tiles and cut them in quarters to make the outer border.  The decorative border is made of stones that look like river stones.  That curved thing you see on the left is our shower.


This is our pedestal sink.  I love it, but the bottom is slightly crooked and we keep forgetting to fix it.


Our kitchen had an ironing board cabinet that was original to the house.  I really didn't want to close it off, but we were unable to incorporate it into the design of the kitchen.  My solution was to simply close it off from the kitchen and open it up from the bathroom.  I built a cabinet to fit in the space, and it now serves as the only permanent storage.  When I get around to it, I am going to make a door (that doubles as an art piece) to conceal the opening.


These are the rosettes I wanted in the trim.  Usually people match the size of the rosette to the width of the trim, but I like them oversized.  And since I am the head (only) decorator on this project, I do as I please.  Like always.


Here is the window that I trimmed out all by myself while Joe was at work.  I felt like a finish carpenter.  I loved it and I was really proud of myself.

You should also know that this wall used to be blank...no window.  When we were laying out the bathroom, we decided that the existing window was in a bad spot.  So we closed that one off and added a new window to this wall.  There's nothing quite like buying a house and then cutting a hole in the side of it with no experience in such undertakings.  My dad was a big help with that one.


Oh, hey...I may have been wrong.  There IS something like buying a house and cutting a hole in the side of it...

How about cutting a few holes in the roof?!  

The original ceiling of the then-pantry-now-bathroom was level with the one in the kitchen.  Since this room sticks off of the back of the house like its own little entity, it has its own roof.  We thought that was an awful waste of space to have that little unused area between the bathroom ceiling and the roof.  We decided that we would remove the ceiling and the framing supporting it, and just leave the ceiling vaulted.  To add extra light (and since I love them) we added two skylights.

Yes, there is still painter's tape on the trim.  No, we are not done painting the trim.  Yes, we know there is paint on the glass.  We're working on it.


Cutting those two holes in the ceiling was probably the most nerve-wracking project we undertook.  We were on our own for that one.  Granted, we had closed off windows in the bathroom and kitchen, reframed one window opening to accept a smaller winder, and added one window from scratch.  

But it's different when the hole is in the roof.  

ANY project is different when you are doing it precariously perched on a surface which is not only elevated, but angled.

We didn't want to reshingle that little section of roof, so each cut had to be PERFECT to preserve the shingles we were trying to keep.  We also had to make sure not to break any of the shingles as we slowly and carefully bent them back to slide the flashing underneath.  Broken shingles or improperly installed flashing would create leaks, and everyone knows, leaks are bad.

Both skylights went in with hitches no larger than tools repeatedly falling off the roof.  We were certain our caulking and siliconing and flashing installation were a success.  And to help us prove this, mother nature threw a storm at us.  It rained cats and dogs.  Joe and I stood in the bathroom staring at the skylights with a flashlight.

I'm pretty sure we weren't breathing.

The final verdict?

The bathroom with no electricity, no plumbing, no walls and no ceiling also had no leaks.

Yee ha.

Our new fridge!

We finally got a fridge.  One that fits in the space.  One that has nary a broken door shelf.  One, most importantly, that does not leak water from the freezer which then freezes in the fridge.


We went to the Sears scratch and dent place in Newington.  This particular brand new fridge has two dents.  One on the side, and one on the back.  For these "ghastly" dents that are completely hidden by our cabinets, we saved $1000 off the sticker price.

Boo ya scratch and dent.

Otter likes it.


We LOVE it.

How Otter decided the kitchen should be decorated.


That cabinet you see in the upper right is the cabinet where we keep Otter's dog food and supplies.  We also happen to keep extra plastic bags in there.  

This morning before work Joe took all of the bags, shoved them into one larger bag, and put them by the door so we could bring them to Stop & Shop and recycle them.

Otter was apparently convinced that the plastic bags didn't just smell like his food, but contained copious amounts of it.

What you see above is what I woke up to today.

Home is where the Hearth is.

Hey, remember how our grout got all screwed up and we had to wait for the new grout to come in and we decided that while we waited we could rip up our hearth in replace it with tile to match our kitchen? 

And remember how that all happened before Christmas?

Well.  We finally finished it.  (Almost.)

The last post showed how we leveled off the concrete that was under the original hearth.  After we got it level, we had to build up the height, so when we layed the tile, it would sit flush with the fire brick inside the fireplace.

We did this by simply layering plywood on the concrete.  Each layer of plywood was attached with good old Liquid Nails, and then screwed into the layer beneath.

(You probably haven't noticed throughout these posts, but it seems that whenever the tv is in the shot, we are watching some sort of sporting event.  It makes me laugh.  Here, it's football...college, by the looks of that logo.  )

My right shoulder is on the verge of falling apart from all my years of volleyball, and it is hard to screw into concrete, so Joe got to do most of the screwing.  (Dirty jokes here.)  

Here, one screw of many.


We added weights to feel like we were at gym.  :)  (And maybe to help out with the Liquid Nails.)


We did all of that work you see above back in December.  What you see below is work we did yesterday.

Onto the almost-level final layer of plywood, we added a layer of cement board.  The tiles had all been cut waaaay back when we started this project, so all we had to do was mix some mortar and slap the tiles down.  We wanted the look of  a single piece of stone, so we didn't leave a grout line.

I neglected to take pictures of the process, so you get only one of the semi-finished result.

(Notice, now on tv, golf.)


The tiles were not perfectly square, so there are slight gaps where some of the tiles meet.  We haven't yet decided what we are going to do about them, but they aren't that noticeable, so we're not worried.

Now all we have to do add some molding around the egdes, and we'll be finished!

Even without the molding, it looks great.  It's a vast improvement from the old, stained, gross stamped concrete.  When you're in the foyer you can see the kitchen tile and the hearth, so it's great that they match now.  It's almost like an actual cohesive design...something the house lacked when we moved in.

And we're just getting started.

Picture Pages.

These are just some random photos I thought you would enjoy that I never added to any posts.

Here are the glass doors we put on the corner cabinets by the sink.  They have textured glass with vertical stripes.

(Notice we still don't have any trim on the window!)


This was one corner of the ceiling that needed an extra piece of sheetrock.  I just liked how the mud looked.


Here's Joe using the wet saw we borrowed.  We did all of the tile cutting after work.  It was always too dark to see anything.  And it was FREEZING to cut the tiles in the cold dark driveway.  I did all of the measuring while Joe did all of the cutting.  Everything was soaking wet and cold, so we didn't mind too much that we only ended up having about an hour of light each night to cut tiles.


A random picture of us.  Joe, wielding a dyson mini vaccuum and I, the handle that doesn't fit on our faucet.


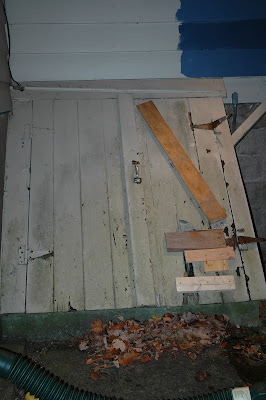
A funny picture of the door that leads into our basement.  It's old and wooden and all rotted out, so we did the best we could to brace it together.  Don't worry, we are getting a new door soon, and will be able to remove the barricade that is inside the basement door.  :)

Jed Clampett will be giddy to get his door back.


How to dry work gloves.


Our trusty work dog.  He had to be in the kitchen with us at all times, so we moved his crate into our work zone so at least nothing would fall on his head.


My dad dropped the hammer onto the work platform and this is how it landed.


Otter on the work platform.  No one dropped him there.  He got up there all by himself.


Otter again. How we recognize him best...sleeping.


Otter, again.  And our shop vac. 


Our completed tile.

So we finally got the grout from Home Depot.  This time, we mixed it by eye instead of following the directions on the bag.  It came out much better that way.  

I did most of the grouting.  


This is the mess I made.  :)  


This is the giant blister I got on my hand from the grout float.  It sucked.


Here's what the finished floor looks like.  All in all it came out great.  I'm glad we had tiled the bathroom first, because it gave me a little bit of practice.  The grout lines in kitchen came out really even and straight, slightly unlike the bathroom. :)


We also tiled the stairs and the little landing by our side door.  We used cool, stainless-looking edger things for the edges of the stairs.  I forget what they are actually called, but they look awesome.


The only things we have left to do to complete the tile job are to put down the transition pieces where the tile in the kitchen meets the hardwood floors in the dining room and foyer.  

But we can't do that until we put trim on the doors.

And we can't do that until it gets warm enough to start working in the driveway again, since we have no place else to set up the chop saw.

Hopefully, we will regain our driveway workshop soon.